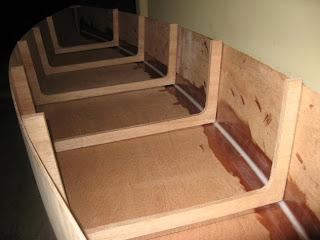
Finally, we have had some nice weather in Seattle allowing me the opportunity to make some more progress. As we finished "phase two" the boat sides were attached to the bottom with an external coat of glass and epoxy and the boat had finally been "flipped." Now we begin working on the interior!
I wanted to build in some reinforcement to the bow and stern posts so I rough cut a couple of pieces of ply which will be glued in later. The tricky part is, I don't have a bench vice (hell, I don't even have a bench!) So how do you hold a piece of plywood vertically so you can work on the edge? You dig out a couple of clamps and get creative!
In the next photo you can see the rough cut inserts for the stern post set in place. This will have a cap over it at some point in the future when I am doing final finishing of the boat.
Knowing that I was going to have epoxy in the chine soon it was time to lay out the frame placement in the boat so I could work on them while the epoxy was curing. It was a simple matter to measure out from the plans where to place them and mark out the placement clearly with a sharpie. My fancy rope clamps come in handy once again!
Now it is time to epoxy fillet and glass the internal chine. Someone gave me the tip of turning the boat on it's edge so the epoxy would flow down into the chine which was a brilliant idea and worked like a charm. I wetted out the seam at the chine first and then came another first for me, doing an epoxy fillet. You mix a thickening agent into the epoxy making a consistency similar to peanut butter and lay it into the chine in a thick clump. Then slowly and smoothly, using a round edged tool designed for this purpose, draw the tool along the thickened mixture making what is hopefully a nice, smooth, curved fillet which makes a round transition at the joint and reinforces it for strength. Then scrape the excess off and below you see what you have...the worlds ugliest fillet!
A closer look...
After my previous learning experience with epoxy I now know that you must try to get all your layers done in one session so after the epoxy had turned tacky and set up a bit the next step was to lay fiberglass cloth into the joint. After my frustration last time with the thick edge of the glass tape I cut that damn seam off and had much better luck fairing it out. It is still ugly as you can see below but much better than last time. I also filled and faired the split seams at the stern of the boat.
While waiting for the epoxy to cure I had enough time to rough cut out the frames. I used the same frame pieces that I had used for the jig so I saved some money there, and they were already the correct shape and just needed some re-sizing. I marked out the interior shape and roughed them out with the jigsaw. Being one piece like this will give them significantly more strength too. A poor man's version of the much preferred grown knees in traditional ship building.
Then I planed them smooth using my new "table vice" setup. I still need to fair the inner curves, round over the edges, and decide the shape of the water channels...
Of course at this point it is impossible to resist setting the frames in the boat and getting a sense of what it is going to look like. I am really psyched to do this because at this point the boat is in a bit of an "ugly duckling" phase with clumpy epoxy and lumpy glass and splotchy resin everywhere. It is nice to get a perspective on how cool it is going to be once I get past this point! Below is the view from the bow...
...and from the stern.
A closer look below with the now cured fillet. I only had time to do one side so it will be next weekend before I will have enough time to do the other side.
This boat is starting to really come together! Stay tuned for more to come...


No comments:
Post a Comment