Tuesday, December 11, 2012

The end is in sight!


What a looong process. The boat that I thought I could crank out in a conservative six weeks (and the design which Dylan Winter built in only ONE week) has taken me over six months! Granted, as the name of the blog clearly states, I am (or was) a first time boat builder, so perhaps my original assessment of my ability to build a boat was a little optimistic.
There were challenges associated with having to build it out in our courtyard, with all the schlepping of tools back and forth, and no ready electricity. There was the stubbornness of having to do the entire thing by myself, without any help from others. There was the frustration of only having a few hours a week to work on the boat between my job, music, relationship, and all the other things that fill up your time while living life. There was the challenge of trying to figure out what all those lines were on the 8x10 sheets of paper that were all I had for a building plan. There was scheduling when I could borrow a truck to pick up the materials that I needed (and the ones I needed again when I made some dumb mistake!) Oh, and speaking of...all the mistakes, those wonderful learning opportunities which came up again and again. Sigh. Paint masks a myriad of things, thank goodness I wasn't ever planning on varnishing! 
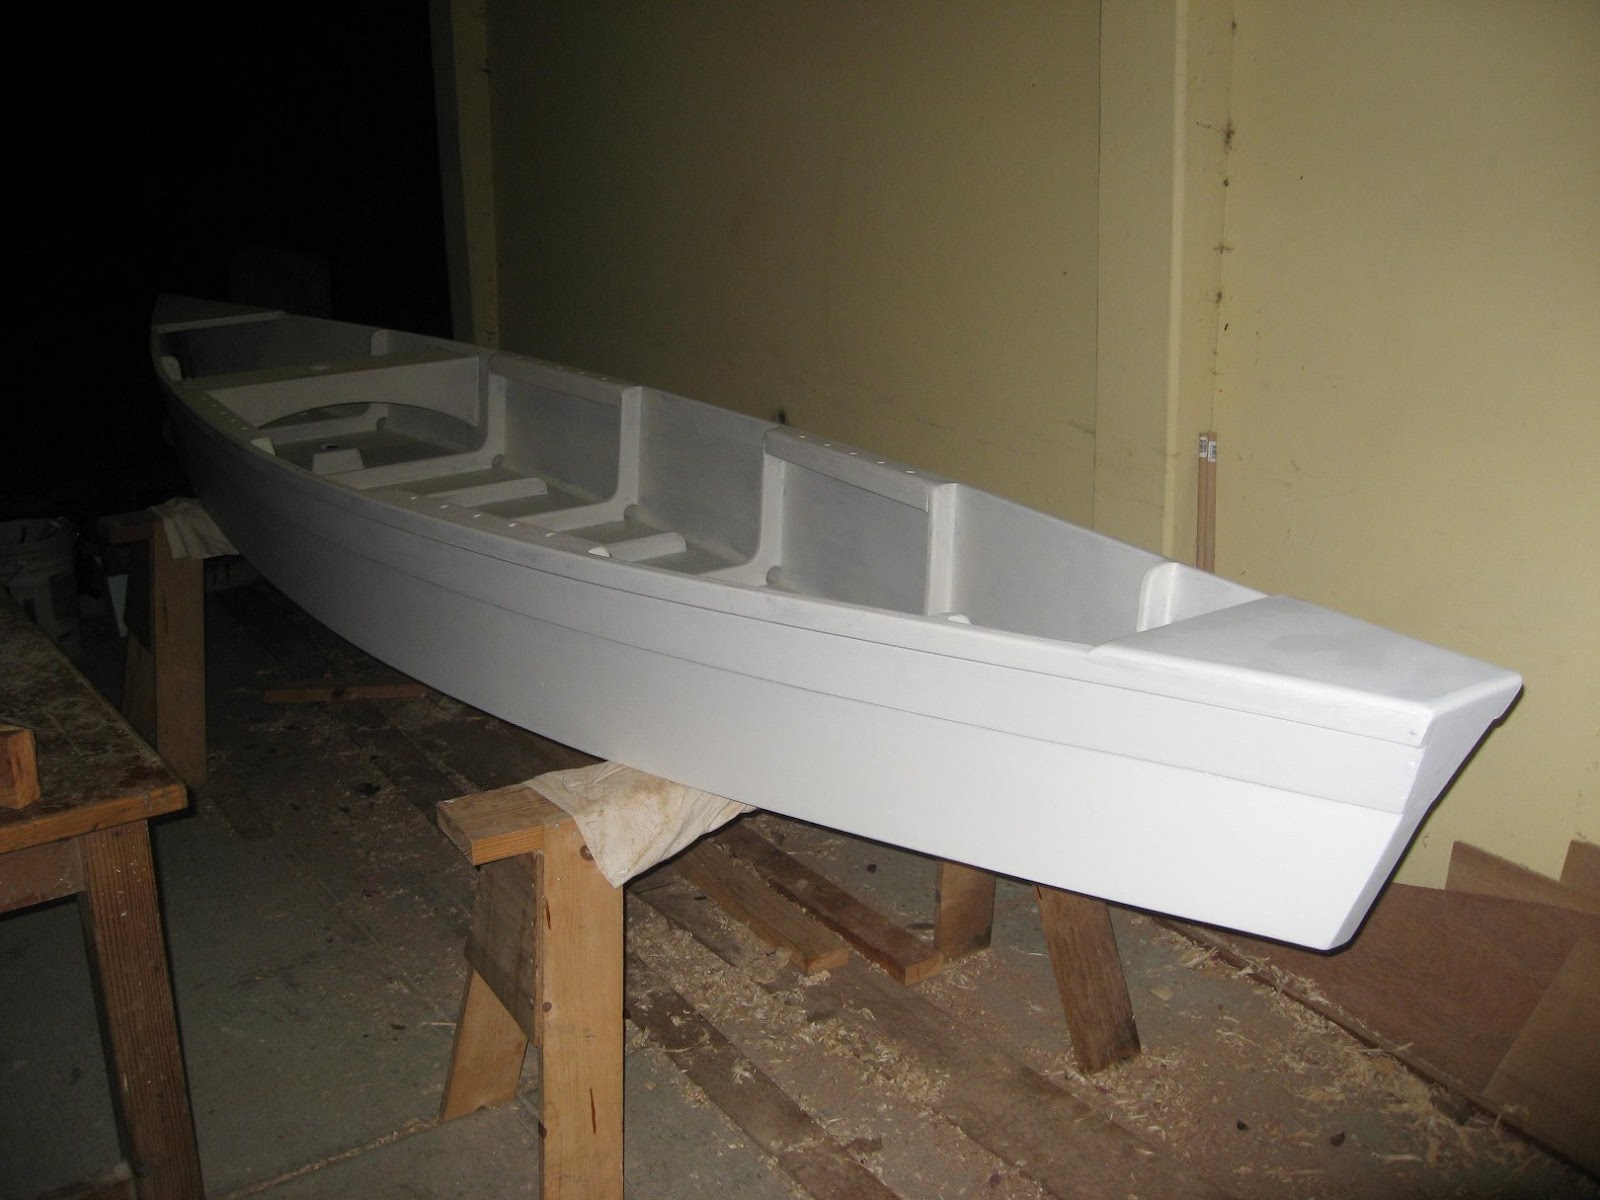
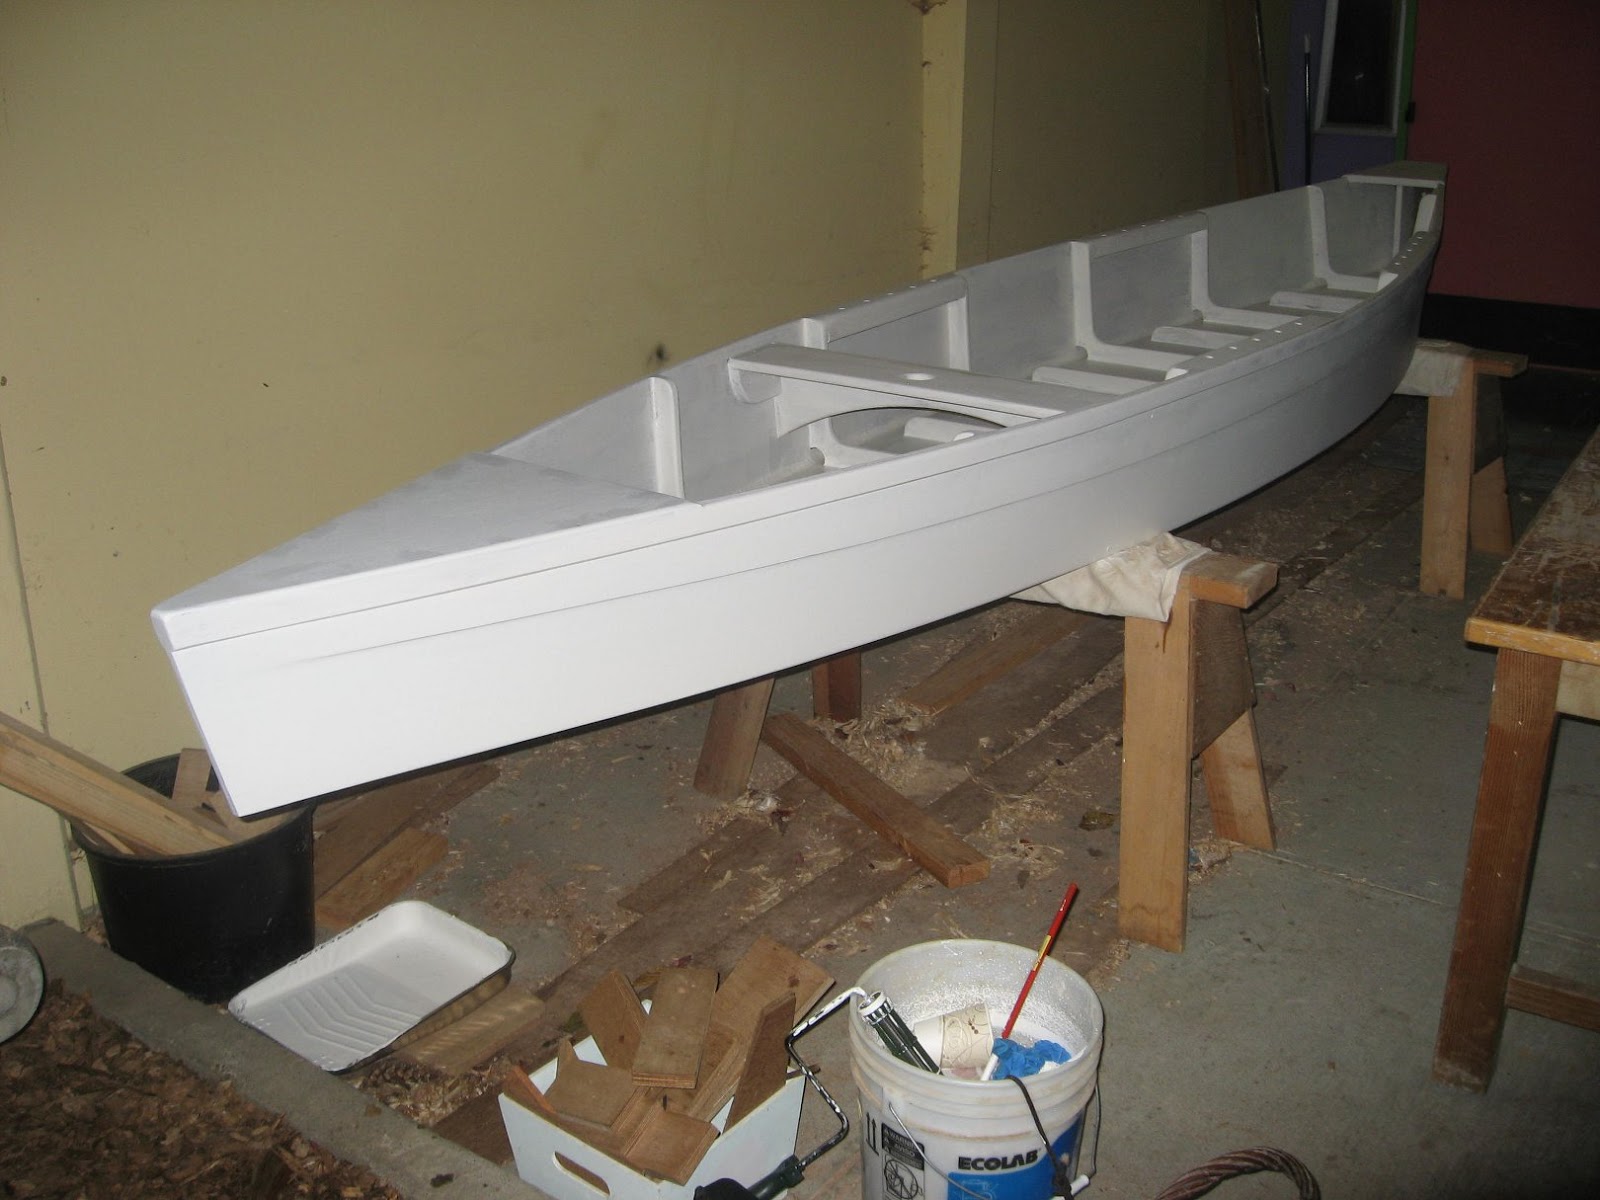
Well, it is certainly not a show piece, and it will never win any awards, but it is good enough for a first boat build, and I am happy enough with it, if not exactly satisfied with how it came out. I have to keep reminding myself that I built it as knock-around boat, and it is going to get pretty beat up in short order, and a Duck Punt is a Duck Punt, not a swan! I still need to put some additional coats of paint on the interior but I am going to wait until spring when it warms up again and call this thing done for now! Enjoy the finished pics and expect my next post to be from the water!


The stern brass skid plates. I don't know why I used two, I think it looks cool though. I should have used countersunk screws but I was out. I'll fix it later.

Here is the bow skid plate. It doesn't fit perfect, but it fits as good as I could get it considering I had to do the bends at work away from the boat.


A boat that is ready to sail! View from the stern quarter.


And from the starboard bow.


And from the port bow.


I still have no idea if I can even get this thing on top of my car. It is really heavy! Maiden voyage will be dependent on decent weather and getting over a little illness I am struggling with. I am a little nervous about sailing it, to be honest. The Duck Punt sails completely different from any other boat I have owned so I have a lot to learn about how it is handled. I hope it is a fun process! Stay tuned!

Thursday, November 15, 2012

"Smooooth strokes, up and down....


 I have finally found something I hate more than epoxy! I hate primer, priming, paint, painting, and anything to do with a brush, roller, or paint can. Well, there is nothing for it, so I started rolling, and brushing, and cursing. The next time I build a boat I am rolling it right into an auto body shop and having them spray the whole damn thing. I can't believe I didn't think of it before! Genius! 

Still, it is nice to get rid of the hideous plywood/epoxy combo finish and turn the boat sorta white. Unfortunately, it is getting quite cold and although the primer is drying, it is not really curing. I had the Punt upside down while priming the bottom, and after a week of sitting curing the primer still scraped off the hull when I rolled the boat to primer the interior. Either the primer was not fully cured, or it did not fully bond to the epoxy. Either way, I came to the conclusion that I don't really care. I am just going to slap white onto this thing until it's covered, and go sailing! This is not a show boat, as I have said before, and I built it to use, not look pretty. It is going to get scratched up, knocked around, banged by rocks and scraped by beaching. I am going to be patching and painting it anyway, so why should I care if it looks perfect from the start? Unlike having a new car, I am really looking forward to that first legitimate scratch so I can claim it as a real boat! Maybe the paint will finally cure next year...

A couple of views so far, with only one coat of primer-


I guess the next post will be the Punt fully painted. I still have to do some rigging and build that interior plank so we have a few more posts to go before we close this chapter as first time boat builder. Stay tuned!

Monday, November 5, 2012

A milestone!

I had thought for a while that I would never say these words, but...I have finished the "construction" phase of the Duck Punt! With the exception of the rigging and the seating, I installed the last piece of wood this week, and began the arduous process of sanding in preparation for painting. I am so excited to be nearing completion and being so close to having a new boat!

I had a fairly long list of projects left to do last time I posted, so let's take a look at what has been done.

I finally tackled the sheer. It sucks. For whatever reason, the sides are not perfectly symmetrical. Perhaps it was building on uneven ground, on rickety sawhorses that moved whenever I touched the boat; perhaps my measurements were a little off while measuring in the dark; but whatever caused it there is a little bit of asymmetry to the sheer, and a bit of twist in the hull. Nothing that will affect performance, but it will be there to remind me that even the simplest of boats are tricky to build perfectly. It's not bad enough to bother me though, and I know the next boat will be better! Once I was done with the sheer I took a router and rounded it over which you can see in the following photos. It gives the boat a much more finished look.

Below you can see the bow which had that former wicked sharp entry. Unfortunately, I need a flat surface to attach a brass rubstrake to so this is the current bow profile. The Punt is a thin water boat and I expect it is going to be running into things from time to time so the brass rubstrake is an important piece!

In the photo below you can also see that I cleaned up the epoxy mess that I had after sheathing the bottom. Another valuable lesson learned...trim your glass to size before installing it and clean up your epoxy before it cures! Grinding off all the excess was a major workout and such a waste of time when I could have just prepped it better. Well, that's what I get for being lazy. This boat is not going to have a mirror finish, that's for sure! I just scraped and sanded the sides and bottom enough to take off the high spots. I think it is going to look kinda rough but we'll see once there is primer and paint on it. Poor, ugly, little punt...


I drilled out the thole pin holes, and since I knew I was going to be spending a lot of time leaning against the planks I gave them a healthy round-over as well.


I decided to deck over part of the bow and stern. This will add rigidity to the hull and give me a place to tie in floatation if I decide to add some. 


Another view of the bow deck...


...and the stern deck.
You can also see in the photo below that I finally rounded over the frames.


It's the return of "Big Heavy Rock!" 
I finally got the punt on the ground and leveled it out so I could put the mast in and figure out the position of the mast step. I used a laser lever to get the mast plumb and marked the position of the mast step and epoxied it down. BHR was there to hold it fast while the epoxy cured. There was no information on the plans for mast rake or placement so after scrutinizing the youtube videos I came up with a highly scientific method and guessed. Probably good enough...  


A complete(ish) boat!


Another view...


So now the main thing I have left to do is sanding. I am not going to go crazy with it because this is a boat that is going to get knocked around a lot, and I am going to be doing a lot of patching and painting anyway. I like the ten foot rule. If it looks good from ten feet, it looks good enough! I also need to figure out the interior deck that you sit on while sailing the Punt. I have seen people use slats, or a central plank, but the Mersea guys use a single piece of plywood and I think that is probably what I am going to end up doing. I think it will be more comfortable, and keep my gear drier too. I also want to rig a back rest of some kind so I am working on some ideas there too. The next post will have this boat painted so stay tuned, we are almost done!!!!

Sunday, October 14, 2012

Runs, drips, and errors...lots of them!!!


This will be a short post. (Keep the applause down, thank you.)

The weather has made a major change here in Seattle, and summer is over. The rain has begun, the temperature has dropped, and the sense of desperation in the Duck Punt build has become tangible. Once the temperature drops below the 50s, the chance of the epoxy fully curing decreases significantly. Well, I still had a lot to do, so I put in some time in the last decent weather window I had, and started sheathing the bottom in fiberglass. 
I had vacillated back and forth throughout the build, trying to decide whether I was going to sheath the bottom, or just leave it raw plywood and paint it. My reasons for leaving it raw were threefold. One being cost; I knew I would have to buy additional epoxy resin and fiberglass cloth, and I wasn't sure I would want to spend the additional money. Well, I needed to buy more epoxy to finish the build so I certainly had enough to do the bottom, and the glass cloth is not that expensive, so that was a fairly minor point. Two being weight; I really want to keep the Punt car-toppable, and adding glass and resin was going to increase the weight of the boat a fair amount. Unfortunately, by using the heavier Hydratek plywood, and generally "overbuilding" as I have gone along, the boat has turned out to be MUCH heavier than I was expecting. I don't know if it would have been car-toppable anyway, but the adding of glass and resin to the bottom was not significant enough to be a factor. And three being time; I am just damn tired of building a boat, and I want to get my ass out there and use it! (Dylan Winter built one of these in 7 days?!) I knew that sheathing the bottom was going to add a couple of weeks to the overall project, and with winter approaching I was worried that I wouldn't have time to finish before the weather prevented me from doing so. This is the disadvantage of building outside when any smart boat builder has their own shop. That being said, I am reminded of what a friend told me when I was lamenting having to build my boat outside. He said, "The vikings didn't have heated shops with lights and coffee makers, they built their boats on the beach!" So...let's get back to work! Sheathing it is!

First, I layed the cloth out and smoothed it over the bottom of the boat, taking out any wrinkles and making sure it was nice and flat and under a little tension so it wouldn't bunch up as I wet it out with the epoxy. Then I trimmed the sides a little long knowing I was going to be grinding and fairing it smooth later. I used a little blue tape to keep it from moving as I was working with it.

The first coat of epoxy wets out the glass and adheres it to the plywood. It's interesting how the glass becomes translucent when wet. The epoxy is applied with a flat plastic scraper which keeps the resin from being too thick and makes it a consistent saturation into the fiberglass cloth.


The second application of resin fills the weave of the fiberglass cloth and gives a smoother surface. The remaining applications of resin provide enough thickness so that you can sand the surface smooth without sanding into the glass fibers of the cloth. I applied two more coats of resin until the surface was built up enough for my satisfaction. Of course, what happens when you apply a liquid to a horizontal surface? It runs, and sags, and drips, and pools, and makes a general mess. That belt sander is going to get a hell of a workout! Below is the bottom with the fourth coat applied.


Another view...


OK, I admit it, that post wasn't as short as I promised. I hope you are still with me! Now, I will let the bottom coat of epoxy cure for all of this week and hope that by next weekend it will be fully cured so I can flip the boat back over and tackle that sheer. I have a feeling I will be using this thing as a toboggan before I get to use it as a boat.  *sigh* 

Tuesday, October 9, 2012

Time to step up...


...to making the mast step.

 I will jump right in because it has been a few weeks and I need to get cracking or this thing won't be done before winter!

The mast step is in fact the next step, as it were. This is the reinforced block that the bottom of the mast sits in to hold it in place, and prevent it from punching through the bottom of the boat (which is considered a bad thing.) I used 3 thicknesses of plywood to build the step, as you can see below. The centerline is marked out and the upper and lower dimensions are marked out to give it a bit of taper. 


Then I use the belt sander to grind it down to the lines. After that I cut through two of the layers of ply to make the cup the mast will sit in.


It is easier to see what I am talking about in this pic. This is just a test fit.


Then back to the belt sander to round over the edges.


And finally the stack of ply is epoxied together. Dowels epoxied in will replace the screws. Final fitting will involve checking the mast height at the thwart and adding epoxy into the bottom of the step to make a strong, hard surface for the mast to actually sit on that will not wear out from the mast pivoting on it.


As you remember if you saw the last post, I had just made the thole pin planks (or oarlocks as I see some people call them who sail duck punts) and they needed to be installed. This was a messy, clampy, rushed process so I will just show you the results! 


Gunwales! I had been agonizing about how to procure some hardwood for gunwales in the correct dimension since I had no power tools that could accomplish the job from rough lumber. I found some oak door trim at the local box store so I grabbed it because the idea of trying to mill lumber at this point was unthinkable. Still, it needed to be scarfed up to be long enough but that was not a problem with my now impressive scarfing skills! This job was made a lot easier by the addition of a belt sander to my tool list.


Once the gunwales were scarfed up it was time to attach them. It turns out they are much stiffer than my battens and as a result they revealed some issues in my sheer line. This became an opportunity to exercise the most important skill I have learned in this entire boat building process. The skill of letting go. In a situation where something has happened and there is nothing you can do about it, you have two options- Stop, or Go. Boats are never perfect anyway, so...  Let's keep going!
It took every clamp I had and could borrow but I attached the gunwales. 


A tricky bit is figuring out how to clamp onto a slippery triangle. The answer is attach another triangle! Sandpaper keeps it from sliding and scrap wood provides a surface to clamp to. It is a good thing I keep most of my scraps!


The first gunwale is on and the second one is clamped up and the glue is curing.


While I had the epoxy out I decided to install the mast thwart support arch. This was another area I made a mistake on waaaay back but I figured out a way to make it work. That thwart is now solid as a rock!


Another view...


And both gunwales are now on!


We are getting pretty darn close to finishing this thing, or so it seems. But then I am foolish enough to look at the "to do" list and it just never seems to get any shorter. Still to come is epoxy and fiber-glassing the bottom of the boat, flushing up the stern and the bow, planing the sheer to its final shape, and then sanding, and sanding, and sanding, and sanding, and sanding, and sanding, and sanding, and sanding, and sanding...and then painting, and etc. *sigh*

Monday, September 17, 2012

Ruffling my own feathers...

How is it that a project can take months longer than the weeks estimated to completion? It seems impossible to have been so optimistic about the amount of time I thought it was going to take to build the Duck Punt when it has taken so long to get to this point. I guess when you only have a few hours per week and you strive to do the best job you can it is bound to take a while but I had no idea how time consuming a boat build really is. Thank goodness I didn't take on building a tall ship!


A really exciting step happened this week and one I have been waiting a long time for. I was finally ready to mark out and cut the actual sheer line of the boat. The sheer is the curve which defines the side of the boat, and although the Duck Punt has a very subtle sheer, it is still so much nicer seeing that than seeing the ugly coffin box profile it had before. 
The process involved using that long, straight, thin piece of wood called a "batten." I measured up from the bottom of the boat at specific points along the sides, as dictated by the plans, and essentially connected the dots with the batten loosely clamped at the bow and stern. Then I scribed a line along the bottom of the batten marking out the sheer on the side of the boat. Then I grabbed my trusty Festool jigsaw, took a deep breath, and cut to the line!

Defining the sheer.

A long and stressful cut!

 Finally, a boat with an attractive profile!

 The view from the bow. This boat is starting to look fast! (It won't be.)

 The thickness of the sides with the additional sheer plank.

Next I needed to cut the hole for the mast in the mast thwart. Then a test fit of the mast thwart support, to be epoxied in after the mast step is installed. The mast step is the base that the mast sits on in the bottom of the boat. I still need to make the mast step but the thwart looks great! 

 Another small but necessary step was the construction and installation of the thole pin planks, as I call them. These will be drilled to accommodate the thole pin that the steering oar is braced against. As you remember if you read the last post, I had a crazy clamp-up for the ash laminations. A few passes over the belt sander cleaned up the glue squeeze-out, leaving a beautifully laminated square plank. 

 Unfortunately, the boat is NOT square which means I needed to taper the planks to match the curve of the hull. It was a simple matter of holding the plank up to the hull and tracing it's profile on the plank, then going back to the belt sander and grinding the plank to the line. Below you see there is still more work to do!

 But, after a while you have a profile which matches the curve of the hull perfectly. This of course takes many test fits to get it perfect, (or close enough.)

 Another big step which I wasn't at all sure how I was going to tackle was the feathering of the sheer planks. It turned out to be a lot easier than I thought! I just turned the boat on it's side and worked at the transition with a plane until I had the rough taper, and then finished feathering it in using a palm sander with an aggressive 80 grit paper. I uncovered an epoxy void, but this will all be fiber-glassed over so I am not at all worried about it. 

 A wicked looking bow! Of course I am going to have to soften the bow considerably, but for now I love seeing it looking all tough and mean.

 Another view...

That is all for now! I figure I am about 80% done. There is still a lot to do but when I look at how far I have come I am really happy. I still can hardly believe it but I think I might actually finish this thing! Duck Punt!!!

Monday, September 3, 2012

A boat builder can never have too many clamps...


Or enough, either. Ahhh, clamps. If only I had a hundred of each type! I STILL wouldn't have too many. There is always some little thing you need to clamp that takes a special type of clamp, or one that reaches a certain depth, or is affordable. OK, we all know that clamp doesn't exist. Let's be real...

My apologies for being SO slow with this next post. To be honest, summer finally came to Seattle, and as any Seattleite knows, you enjoy it while you can because in a matter of weeks it is gone and it is back to gray, rainy, cold, wet, misery. So, I have been enjoying the summer instead of boat building, not that boat building is not fun, but...well, anyway. Let's get caught up!

I needed to find something relatively simple to tackle since doing the sheer planks was the next major step and I needed cooler weather for the major amount of epoxy involved in that process. The thole pin planks still needed doing so that was next. I picked up a big chunk of ash and since I don't have a table saw I went to the trusty track saw to cut the laminations. It was a huge cut, barely manageable by the blade depth available, but I made it work and gave the saw a good workout.

The track saw set up for cutting the laminations.


Some of the laminations cut out.


The ridiculously complex glue-up for the thole pin plank laminations. It was already partially cured before I brought it in and set it on the hideous carpet!


Another smaller, but important, step I needed to tackle was the mast thwart. Below you can see the thwart being test fit before the glue up. This is a compound angle and plenty tricky to get it to fit "light tight." Totally unnecessary, but sometimes the cabinet-maker rears his ugly head and the tolerance of a joint becomes an obsessive compulsion. Once in a while it is OK to just go for it though, so I did!


Once the placement of the mast thwart is marked out and it is cut to fit, it is a simple matter of epoxying the thwart in place, as well as the supports fabricated to fit below. 


No, this is not a seat! How many times have I been asked that since I installed this piece? Geez!


There is an arched support piece which gives bracing to the mast thwart. The easiest way to cut the arch is with router on a radius jig. First, you mark out the radius on the board using a huge compass called "trammel points."


Then you transfer the measurement onto the router radius jig and attach the board to the jig. The hole in the jig shows exactly where the router blade is going to cut, making it easy to double check your set-up.


Then it's a simple matter to make shallow cuts with your router until you have cut the arch out of the support. 


While doing these other projects I was doing test fits of the sheer planks and checking clamping set-ups in preparation for attaching the planks.


I need more clamps!!!


The time finally came with a weather window in the 60's at night and I mixed up enough epoxy to coat the side of the boat. I decided that it would be easiest to control the process if the boat was on it's side, and I had marked out the edge of the sheer plank so I would know where to apply the epoxy so I wouldn't have excess all over the place. This step had to be done very quickly so all you see is the final product! Things went suprisingly smoothly considering the size of the job.


Naturally, the bottom edge of the plank needed the benefit of my now skillful "filleting."


The next night I pulled all the clamps off one side, flipped the boat, and glued up the other sheer plank.


 Another view...


Tonight I am going to go pull the clamps off and put the boat back on it's belly. The next step will be marking out the actual sheer at the gunwale and rough cutting the sheer with the jig saw. Then I will fair that curve, round over the frames, attach the gunwales and fair again. Then attach the thole pin planks and drill them, attach the mast thwart arch support, build and attach the mast step, and plank over the bow and stern caps. The last step will be to glass the bottom of the hull, sand, and paint it. The maiden voyage is not too far away on the horizon. Stay with me and we can get there together!