Monday, September 3, 2012

A boat builder can never have too many clamps...


Or enough, either. Ahhh, clamps. If only I had a hundred of each type! I STILL wouldn't have too many. There is always some little thing you need to clamp that takes a special type of clamp, or one that reaches a certain depth, or is affordable. OK, we all know that clamp doesn't exist. Let's be real...

My apologies for being SO slow with this next post. To be honest, summer finally came to Seattle, and as any Seattleite knows, you enjoy it while you can because in a matter of weeks it is gone and it is back to gray, rainy, cold, wet, misery. So, I have been enjoying the summer instead of boat building, not that boat building is not fun, but...well, anyway. Let's get caught up!

I needed to find something relatively simple to tackle since doing the sheer planks was the next major step and I needed cooler weather for the major amount of epoxy involved in that process. The thole pin planks still needed doing so that was next. I picked up a big chunk of ash and since I don't have a table saw I went to the trusty track saw to cut the laminations. It was a huge cut, barely manageable by the blade depth available, but I made it work and gave the saw a good workout.

The track saw set up for cutting the laminations.


Some of the laminations cut out.


The ridiculously complex glue-up for the thole pin plank laminations. It was already partially cured before I brought it in and set it on the hideous carpet!


Another smaller, but important, step I needed to tackle was the mast thwart. Below you can see the thwart being test fit before the glue up. This is a compound angle and plenty tricky to get it to fit "light tight." Totally unnecessary, but sometimes the cabinet-maker rears his ugly head and the tolerance of a joint becomes an obsessive compulsion. Once in a while it is OK to just go for it though, so I did!
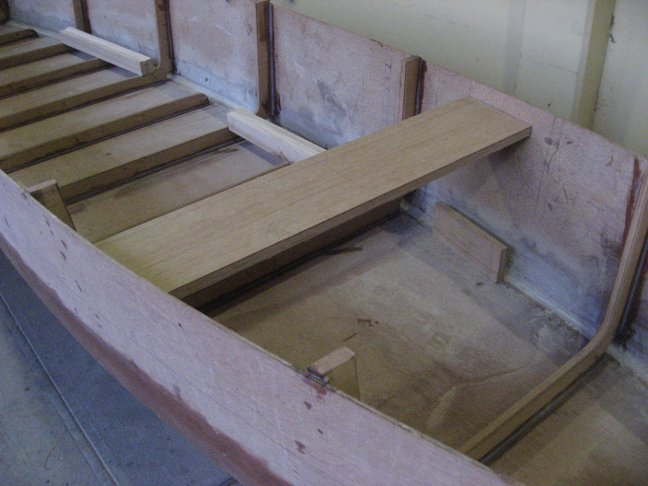

Once the placement of the mast thwart is marked out and it is cut to fit, it is a simple matter of epoxying the thwart in place, as well as the supports fabricated to fit below. 


No, this is not a seat! How many times have I been asked that since I installed this piece? Geez!


There is an arched support piece which gives bracing to the mast thwart. The easiest way to cut the arch is with router on a radius jig. First, you mark out the radius on the board using a huge compass called "trammel points."


Then you transfer the measurement onto the router radius jig and attach the board to the jig. The hole in the jig shows exactly where the router blade is going to cut, making it easy to double check your set-up.


Then it's a simple matter to make shallow cuts with your router until you have cut the arch out of the support. 


While doing these other projects I was doing test fits of the sheer planks and checking clamping set-ups in preparation for attaching the planks.


I need more clamps!!!


The time finally came with a weather window in the 60's at night and I mixed up enough epoxy to coat the side of the boat. I decided that it would be easiest to control the process if the boat was on it's side, and I had marked out the edge of the sheer plank so I would know where to apply the epoxy so I wouldn't have excess all over the place. This step had to be done very quickly so all you see is the final product! Things went suprisingly smoothly considering the size of the job.


Naturally, the bottom edge of the plank needed the benefit of my now skillful "filleting."


The next night I pulled all the clamps off one side, flipped the boat, and glued up the other sheer plank.
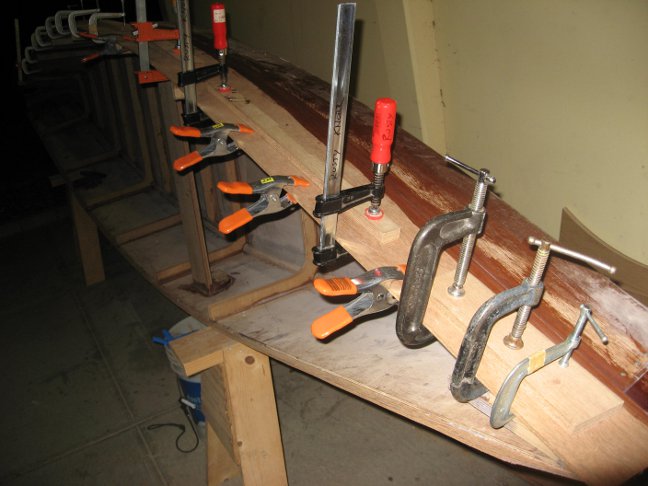

 Another view...


Tonight I am going to go pull the clamps off and put the boat back on it's belly. The next step will be marking out the actual sheer at the gunwale and rough cutting the sheer with the jig saw. Then I will fair that curve, round over the frames, attach the gunwales and fair again. Then attach the thole pin planks and drill them, attach the mast thwart arch support, build and attach the mast step, and plank over the bow and stern caps. The last step will be to glass the bottom of the hull, sand, and paint it. The maiden voyage is not too far away on the horizon. Stay with me and we can get there together!


Wednesday, August 1, 2012

Installing frames rocks!

Tonight's installment of "Duck Punt Building 101" begins with  a test fit of the sheer planks. At first I struck a line along the side of the boat indicating where the sheer plank would line up and then I just clamped the plank in place to check my fit. Spot on. Whew! Next, I need to figure out how to "feather" the sheer plank into the bow. This may require the purchase of a new belt sander. Damn, I hate buying tools. (Not.)

Below you can see the sheer plank clamped in place from the bow,


and a view looking towards the stern. 
I can hardly wait to cut the sheer to final dimension and lose that boxy, "coffin" look.


The next step was finishing the frames. There are 6 full frames and 5 half frames. The full frames are already installed and now it is time to get the half frames installed. After cutting them to final length and width I rounded the ends over with my uber cheap, tabletop belt sander (every bit as ugly as the drill press, I will spare you.) Then I needed to round over the edges to match the full frames. The challenge is how to hold on to such a small piece when routing. I solved this by clamping a backing board (which allowed the router more surface area to travel on) and drove two small screws up through my table so they were just protruding about 2 mm. I butted the half frame up to the backing board, gave it a small tap to seat it on the screws and routed away with no movement and no problems at all. Simple and effective!


Of course, I just HAD to see the frames in there before glue up!


Once it was time to epoxy the frames in the the boat I had another challenge. When working by yourself, how do you hold the half frame while screwing it in place from below the boat? Again, we call on our friend "Big, Heavy, Rock." 


First I drove 3 screws up from the bottom so they were protruding about 2mm, similar to the trick I used when routing. I wetted out the area where the frame was going to be glued, and then applied a thickened bead of epoxy to the bottom of the half frame. I carefully placed it over the 3 screws and pressed it down to seat it. Then, I tri-folded a piece of sandpaper and set it on the half frame, then cantilevered a small piece of plywood over from one of the full frames and set BHR on it to hold it down. The sandpaper provided just the right amount of friction to keep the frame from twisting as I crawled around in the dirt on the ground under the hull and drove the screws into the half frames. Then I used the gloved finger to fillet the squeeze-out and in 30 minutes I had the rest of the frames installed!


The view of all the frames installed from the bow,


and from the stern.


Almost unbelievably, I am starting to run low on epoxy and I don't think I am going to have enough to finish the punt. Dammit! That stuff is SO expensive and I thought I was being pretty miserly with it. It is going to take a lot to glue the sheer planks on, and then there is the gunwales, the mast step and partner, the frames the thole pins go through, etc. I may have to buy another gallon, or at least another quart. $$$$$$$ At that point, I may as well coat the bottom with glass. Sigh. Will I ever finish this thing? Stay tuned to find out!

Monday, July 23, 2012

High fashion, and a big day!


It is late, so this may be a shorter post, but filled to the absolute brim with information and excitement! OK, that is probably an exaggeration, but let's begin anyway...

The next step in the Duck Punt build was to sand the inner chines in preparation for installing the frames. As you probably remember if you have been following the previous posts, my last experience sanding epoxy was less than fun. No, it absolutely sucked! So, this time I was prepared. I bought the oh so fashionable suit that you see part of below (it was way too embarrassing looking to show you a full length shot,) donned my full-face respirator and in 80 degree weather went to work on sanding the interior chines. To be honest, I didn't go all out on this process, and went to the most important of boat builder's criteria..."Good Enough." It was really hot, hard work and I was totally exhausted by the end of it. 


Thank goodness for "Good Enough."


Once I had rested my poor back it was time to tackle that bow piece. I dug out my trusted Dozuki and removed the bulk of the material and then used hand planes to take it down flush before giving it a good sanding. I wish I could leave it sharp like this! Unfortunately, I need to round it off a bit more to allow room to mount a bronze skid plate to take the majority of frontal impacts from rocks and beaching of the Punt.


OK, now for the exciting part! Time to mount the frames in the boat! Since I am working by myself I had to figure out a way to hold the frames in place while I crawled below the boat and drove the bronze screws in to hold everything secure while the epoxy cures. A couple of pipe clamps and a piece of 2X4 held down by a really heavy rock as a brace did the trick as you can see by this test run.


Ta-Da! The frames are installed! The squeeze out from the epoxy is turned into a small fillet using the time tested "Finger Technique." This is nothing more than running your finger down the bead of epoxy (with gloves on, of course) to give a nice, smooth fillet. Everything went exactly as planned, and it is so cool to see the Punt become a functional, stiff hull!


A close-up of the "finger fillets" prior to cleaning up, and the newly sanded chine with its fillet.


And another view of the hull with all the frames epoxied and screwed in place.


As soon as I have a free day I will install the half frames and then proceed to attaching the sheer plank. Fun times! So far I am really loving boat building. This is such a cool experience!


Saturday, July 14, 2012

Down the drain, in a good way...


Despite the dramatic thunder and lightning storms we have had over the last couple of days, I have managed to make some more progress on the Duck Punt build. There is nothing like working on a boat with nature playing her dramatic symphony right over your head. Even though my work space is outside, thank goodness it is covered!

Glassing and filleting of the second chine went pretty smoothly, if not actually very smooth. This time, since I had a better idea of what to expect, I kind of just slapped the epoxy in there and was more relaxed about drawing out the fillet and it went really well. At least it looks as good as the other chine, which is really all that matters at this point. Matching ugliness! 


Once I had the chine glassed and the epoxy was curing I moved on to the next step which was cutting out the space in the corners of the frames to allow water to drain through when the boat is heeled. I used a forstner bit in a hand drill to rough out the corner, and then used a drum sanding bit in my ultra crappy, (given to me for free,) rusted, chinese drill press and just pushed the corner in until it was the same shape as the drum.


The next day I decided that it was time to clean out my tool box and below you see the chaos that ensued. Still, a worthy project and one that desperately needed doing! (I told you that drill press was a piece of crap!)


Once the tool box mayhem was under control, it was time to do some work on the frames in preparation for installing them. I stacked and batch sanded them with my palm sander, and then used a round-over bit in my router to ease the edges so they would be comfortable when I am leaning on them. Below is a dry fit to check for adequate clearance for the fillet.


Another view...


Below is a close up showing the round-over and water drain. This view also shows the thickness of the frame. I feel like using the plywood uncut (without a joint in the corner) is going to give me a very strong frame with very little flex.


And below is another view of the boat with all the frames dry fit in place. Cool!!!


 I bought a chunk of African Mahogany to use for the bow piece, (over-sized so I could shape it in place) but I had to figure out a way to clamp it on to the angled bow while the epoxy cured. I am not proud of it, but below is true innovation at work...the poor man's angled clamp. Thickened epoxy and a huge rock, I really am a boat builder now!


Once the epoxy cures in the chines I will begin sanding the interior to smooth it in preparation for paint, and then I can attach the frames. I can then shape the bow piece at my leisure and glass it for extra impact protection. Phase three will then be complete! Then it will be time for side panels, gunwales, oar chocks, mast partner, etc, etc, etc...

Monday, July 9, 2012

It wasn't my fault...I was framed!


Finally, we have had some nice weather in Seattle allowing me the opportunity to make some more progress.  As we finished "phase two" the boat sides were attached to the bottom with an external coat of glass and epoxy and the boat had finally been "flipped." Now we begin working on the interior!

I wanted to build in some reinforcement to the bow and stern posts so I rough cut a couple of pieces of ply which will be glued in later. The tricky part is, I don't have a bench vice (hell, I don't even have a bench!) So how do you hold a piece of plywood vertically so you can work on the edge? You dig out a couple of clamps and get creative!


 In the next photo you can see the rough cut inserts for the stern post set in place. This will have a cap over it at some point in the future when I am doing final finishing of the boat.


Knowing that I was going to have epoxy in the chine soon it was time to lay out the frame placement in the boat so I could work on them while the epoxy was curing. It was a simple matter to measure out from the plans where to place them and mark out the placement clearly with a sharpie. My fancy rope clamps come in  handy once again!


Now it is time to epoxy fillet and glass the internal chine. Someone gave me the tip of turning the boat on it's edge so the epoxy would flow down into the chine which was a brilliant idea and worked like a charm. I wetted out the seam at the chine first and then came another first for me, doing an epoxy fillet. You mix a thickening agent into the epoxy making a consistency similar to peanut butter and lay it into the chine in a thick clump. Then slowly and smoothly, using a round edged tool designed for this purpose, draw the tool along the thickened mixture making what is hopefully a nice, smooth, curved fillet which makes a round transition at the joint and reinforces it for strength. Then scrape the excess off and below you see what you have...the worlds ugliest fillet! 


A closer look...


After my previous learning experience with epoxy I now know that you must try to get all your layers done in one session so after the epoxy had turned tacky and set up a bit the next step was to lay fiberglass cloth into the joint. After my frustration last time with the thick edge of the glass tape I cut that damn seam off and had much better luck fairing it out. It is still ugly as you can see below but much better than last time. I also filled and faired the split seams at the stern of the boat.


 While waiting for the epoxy to cure I had enough time to rough cut out the frames. I used the same frame pieces that I had used for the jig so I saved some money there, and they were already the correct shape and just needed some re-sizing. I marked out the interior shape and roughed them out with the jigsaw. Being one piece like this will give them significantly more strength too. A poor man's version of the much preferred grown knees in traditional ship building.


Then I planed them smooth using my new "table vice" setup. I still need to fair the inner curves, round over the edges, and decide the shape of the water channels...


Of course at this point it is impossible to resist setting the frames in the boat and getting a sense of what it is going to look like. I am really psyched to do this because at this point the boat is in a bit of an "ugly duckling" phase with clumpy epoxy and lumpy glass and splotchy resin everywhere. It is nice to get a perspective on how cool it is going to be once I get past this point! Below is the view from the bow...


...and from the stern.


A closer look below with the now cured fillet. I only had time to do one side so it will be next weekend before I will have enough time to do the other side.


This boat is starting to really come together! Stay tuned for more to come...


Monday, July 2, 2012

Phase 2 done...flipping with joy!

Tonight was an exciting night! But, first things first. We have a lot of catching up to do!

It has been a long time since my last post, my apologies. The truth is, I have been super busy with work and the weather has been just awful. No excuse really, but it does sap ones motivation. Still, slow progress has been made so let's begin with the first of a lot of photos showing what has been happening.

As you may recall from the last post, I had planned on using a router and a flush trim bit to trim the bottom panel to the side panel's fair curve. I discovered that the side panels were much too flexible at this stage to support the router bit enough to make a clean cut so, it is back to the trusty hand tools! I cut the bottom panel as close as possible with my jigsaw and then trimmed it flush with a selection of hand planes held vertically. This was a TON of work but produced a nice edge as you can see in the following two pictures.


Swinging a jointer plane side to side along 32 feet of boat edging is unbelievably exhausting!


I then rounded the chine over with sandpaper to make a soft curve that the fiberglass tape could easily mold over. At this point, we are ready for glassing! Below you will see the boat prepped and ready, with a light line drawn on as a reference for how far down to run the epoxy wet out.


As with so many steps on this boat, this is my first time using epoxy and fiberglass together. I can't say that it was a fun experience, I hate working with epoxy. Nasty stuff and not good for you, avoid any and all contact with it! This was another significant learning opportunity and I made huge mistakes here by not following the manufacturer's directions closer and having limited time. The first lesson I learned is evident in the two following pictures and you can see it in the distinct white line on each side of the glass tape. That is a seam that holds the stitch of the tape together and should be cut off before the tape is applied, or after, but definitely before the epoxy cures. That, and you must make sure you apply all coatings necessary to fill the weave before the epoxy fully cures. You guessed it...I ran out of time and had to let it cure.


The horrible white line is very evident in this picture below.


The result of my two mistakes here was the need to do a MASSIVE amount of sanding to fair the epoxy into the plywood. My third mistake was not covering myself from head to toe in a tyvek suit to keep the dust off. I wore an air filter and glasses but I was literally covered in epoxy dust. That is a big mistake that I will NOT make again. 
I guess the unfortunate necessary steps produced the result I needed though and the epoxy was eventually faired out. A rough sanding and a thorough washing removed the amine blush and dust and prepared the surface for the subsequent coats necessary to fill the weave of the fiberglass cloth and build up the thickness of the epoxy enough so it can be sanded smooth to proved a good surface to paint.


In the photo below I have applied a couple more coats of epoxy to the seams to fill the glass weave, and tipped the coats out thinner and thinner as it moves away from the edge.


The epoxy coating is now thick enough to sand smooth without affecting the glass below.


While waiting for these epoxy steps to finalize I had the opportunity to continue my scarf practice and I think I am getting the hang of it, if I say so myself. These are good scarfs! These sheets will be the upper reinforcement planks for the Duck Punt's sides.


Below the scarfed together planks are stacked, marked out, and cut to shape, then faired with those ever so useful hand planes.


Finally for the exciting part! At this point it was time for the satisfying step of lifting the boat off of the jig and flipping it right side up. This is a big step because it allows the boat builder their first opportunity to see the rough shape of the boat and start imagining how it will look when finished. One has to control ones desire to jump in the boat at this point to "see how it feels."


Weird how night time lighting makes things look blue from certain angles...


I am really excited!


So, I consider this to be the end of phase two. Phase one was building the jig and installing and leveling the station molds. Next will be glassing the inside seams and framing the interior. 

I am starting to think I may actually finish this thing. Duck Punt! Duck Punt!